This post came across my Facebook feed right when I was working with a teen having ADHD. She was struggling with task management and while we had her physical space in good order, keeping up with school, activities and personal life was a challenge. I’d worked with Trello before but serendipitously this came back on my radar and turned out to be a hit with my client! Thanks so much to Beth for allowing A Fresh Space to repost this super helpful information!
[vc_separator type=’normal’ position=’center’ color=” thickness=’1′ up=’25’ down=’40’]
I love using Trello to organise my life and I’ve mentioned it a few times in the Smart Girls with ADHD Facebook group. Recently, I’ve been asked to explain how I use it so I’ll give that a shot here.
I first came across Trello in 2014 while I was studying software development. I loved it immediately: the simple user interface, the ability to add links, videos, documents and photos to my to-do cards, the backgrounds.
I know what you’re thinking. Yes, it’s new and shiny… Those us you with ADHD can relate to this one: the “new and shiny” rating of any app is an important factor – at least for the first week. The problem is, as you’d expect, we don’t always stick around…
I didn’t.
Within a few weeks of using Trello for a class software project, I was outta there. Not intentionally – just in that “oops I haven’t actually used it in 4 months ADHD way”. I guess I just didn’t have a purpose for it any more – or so I thought. Besides, there was Asana. Basecamp. Freedcamp. Any.Do. Todoist. Wunderlist. And a plethora of other productivity apps. These are all wonderful and each of them brings with it its own advantages. You may find that you’d prefer to stick to one (or all) of these. Perhaps you’d rather experiment with any new ones that appear on the market. The key is to find one that works for you. Once you find it, good. Now get to work!
I came back to Trello by accident. I had a project for work, needed to make a list, and found myself right back at Trello as though it were natural. If you like making to-do lists and if you love Pinterest, Trello is the one for you!
1. Sign Up for Trello
Begin by signing up for Trello here for free. It only takes about 2 minutes and is a pretty simple process that can be done using your email or with your pre-existing Google account. There’s no Facebook sign-up option at the moment — but I really hope this will change soon! (I love Facebook sign-ins as I don’t have to deal with the dreaded “Forgot Your Password?” button which I have to press waaay too often).
2. Create Your Boards
Once you’ve signed up for Trello, you can create your first board. I use boards to separate my tasks and plans into a few general areas. Personally, I like to keep my repetitive daily tasks separate from my to-do list and my long-term plans.
Here are my top 3 boards (which I’ve starred in Trello to make sure I keep an eye on them when I log in).

- Days of the Week — this is where I keep my regular schedule. If I have to do the same thing every Monday, it goes in here.
- 3 Things — In this board I ask myself the question: What 3 things could I do to make tomorrow better?
- Blog Post Ideas — Here, I note down potential blog post ideas as I think of them.
A board can be set up for your own needs: school, meal planning, to-do lists, wish list, bucket list and whatever. Get creative!
3. Get Started on Making Your Lists
Okay, now it’s time to get specific.
Within each board, you create lists, and within each list, you have cards. Here’s an example of how I’ve used this:
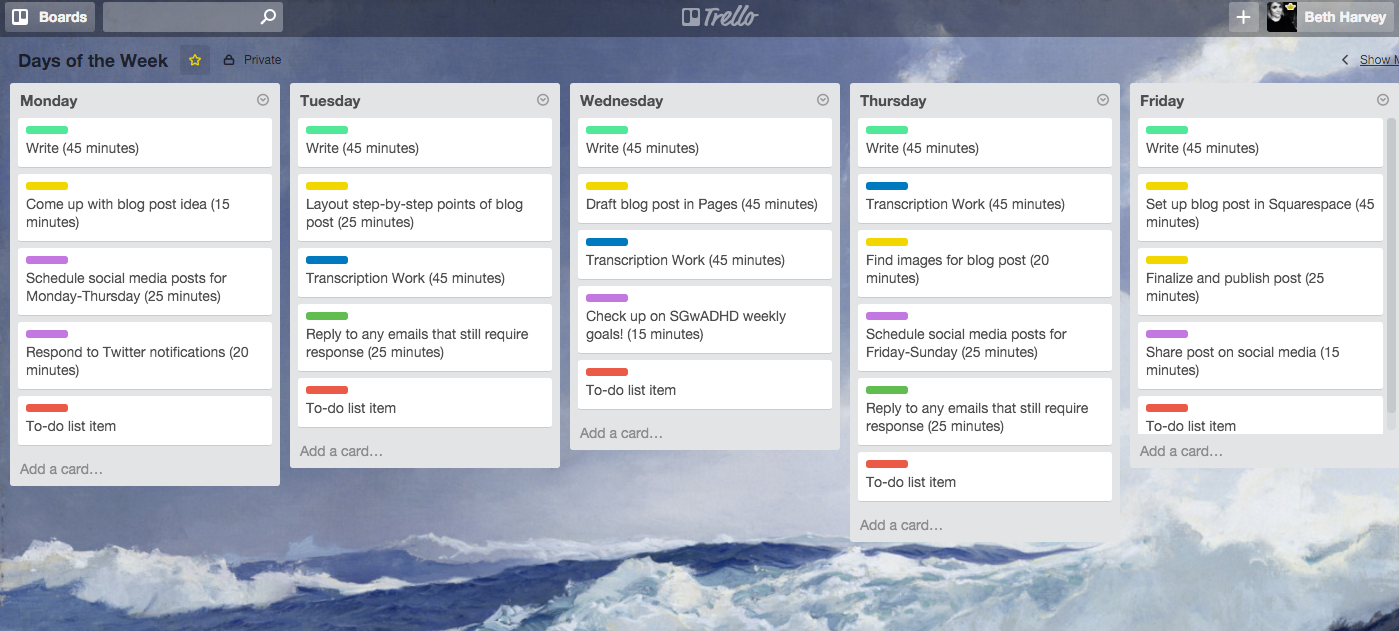
You’ll see that I’ve named my Days of the Week lists after, well, the days of the week (Monday-Friday, at least). Within each list, I’ve then created colour-coded cards for each task that I need to carry out each day. Yellow for blogging, purple for social media, etc.
Lists are pretty flexible and I use them in a ton of ways. For instance, my to-do list is separated into To-Do, Doing, and DONE.
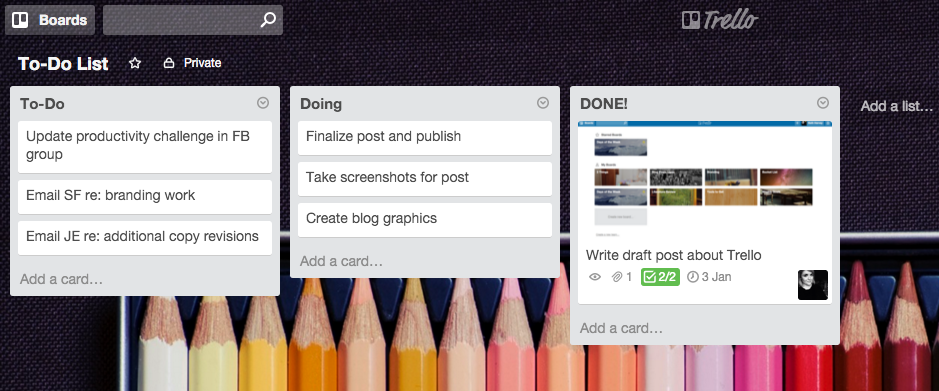
Try naming lists in a way that will make you feel productive and inspired. For me, it’s such an accomplishment to drag a task over to the DONE list.
4. Add Some Cards
Finally, within each list, you have your cards. These are the actual tasks in my case (but you can use them in a number of ways). The cool thing is that when you click on a card, it opens and allows you to add a checklist, attachments, or team members.
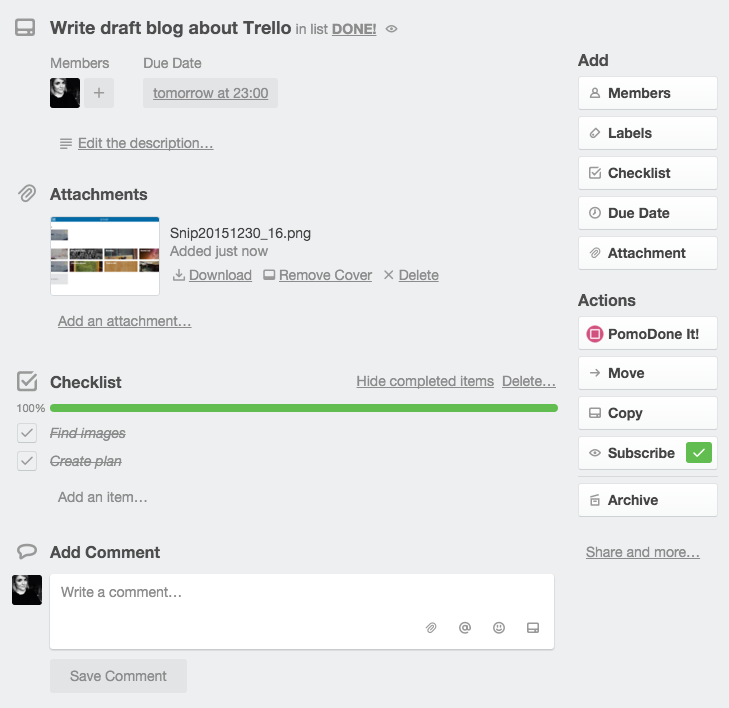
I won’t go into too much detail as I think it would actually over-complicate what is a really easy-to-use tool. Just know that it’s excellent as it lets you store a lot of information in one place.
5. Bonus Step! Integrating Trello with Pomodone
Finally — I’m not going anywhere without mentioning my favourite part!
I’ve begun using an app called Pomodone, which is a Pomodoro timer (you may already know how much I love the Pomodoro Technique). The cool thing about this app is that you can connect it directly to your Trello account.
This means that you can assign time slots directly to specific cards.
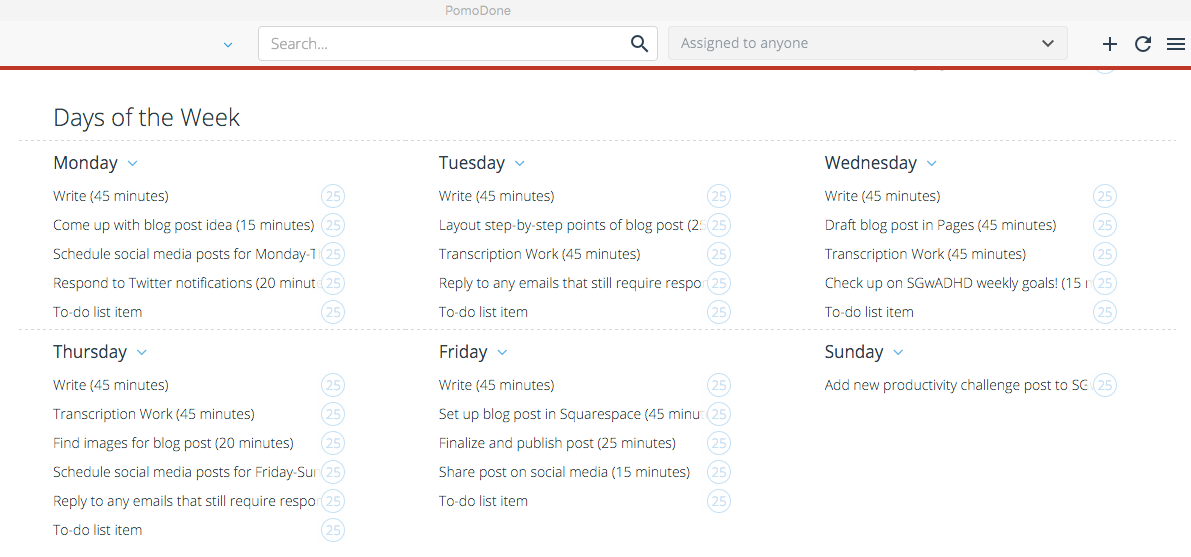
Start by signing up for a Pomodone account. Once you’re registered, you are given the option to connect to your Trello account (as well as Evernote, Wunderlist, and Asana, to name a few). Once connected, Pomodone displays a view of your Trello boards, lists, and cards.
Okay, now just hover over a specific card and you can select the amount of time you need.
And there you have it. You’ve got a task and a countdown clock. There’s nothing like an immediate deadline for an ADHD’er to make you quit procrastinating and get straight to work!
If you need more time, just restart a new timer after your break and Pomodone records how many time slots you used to complete the task (great if you’re a freelancer paid by the hour, like I am).
Let me know if this has helped you. Or if you can’t work it out, just ask me any questions in the comments below! Do you use Trello? What is your go-to method for your to-do list?
Check out the article – How to ADHD-Proof Your Schedule Using Trello.
[vc_separator type=’transparent’ position=’center’ color=” thickness=’1′ up=’60’ down=’40’]

